 |
RC Helicopter Set-up by HollyHeli (John Wilson) |
|
RC Helicopter Set-up by HollyHeli (John Wilson) |
Some people love collecting tools (I'm one of them). Others just want the cheapest essential ones to get the job done. I'll try to cater for both, but don't forget that better quality items will outlast those cheaply made from poor quality steel and save you some grief through not breaking or wearing out prematurely. Unfortunately, in my experience, with Asian imports, price (and even make) is not always a guide to quality, so buying small tools can be a bit of a lottery. Also, using the wrong (or no) tools or essential equipment can impact on safety, which is covered in the second sub-section – please don't skip that one.
OK, firstly the must-have list; some of these tools are specific to RC helis, but don't have to cost the earth. Don't forget, this is for set-up and may not include everything needed for kit construction or general heli repair. The suggested sizes will depend on your particular machine, I've just listed the popular ones, you may not need them all.
Essential Set-up Tools & Equipment
Metric Allen keys or Allen drivers, 1.5, 2.0, 2.5, 3.0 mm for tightening flybar paddles, locking the boom and installing main and tail blades. Look for tempered and hardened steel particularly in the smallest sizes. Align drivers seem OK, but so do some of the Esky ones. The little drivers in the very popular boxed heli toolkits (usually coloured black) are very soft and weak.
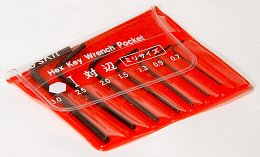
Small set of Allen keys for sub-micro helis.
Hex nut drivers, 4.0, 4.5, 5.5, 7.0, 8.0 mm for blade grip nuts.
Cross head screwdrivers for motor bolts, some tail blade grips and boom locking.
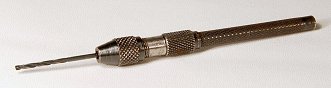
Pin vice (vise) for holding tiny drills used to open out the holes in servo horns.
Thread lock (Loctite), blue, use on flybar grub screws, paddles and motor bolts.
Soldering iron, see 'How to remove bolts and screws that are thread locked in'.
Ball link pliers for safely removing and installing the plastic ball link end cups from the balls on control/mixer arms, swashplates and blade grip pitch control arms. Choose an appropriate size, curved are usually easier to use than straight. I have modified two out of these three to make link removal in tight spaces and grasping a link easier.
Needle nose pliers (smooth) for grasping threaded rods for ball links.
Tweezers, blunt and fine pointed for manipulating bolts, washers etc. that fingers are too fat to reach.
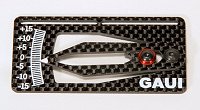
Pitch gauge, bigger ones are more accurate and will take wider blade sizes.
Caliper gauge, electronic read-outs are much easier to use, but may not be more accurate than a vernier scale and are not essential.
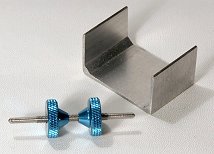
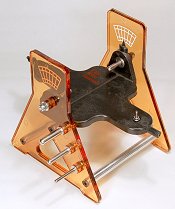
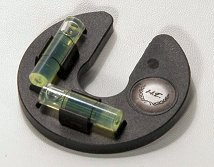
Simple blade balancer of the 'prop balancer' type; the one shown is by Align. The little U shaped stand is home-made to provide a 'knife' edge bearing for the rod.
4.8v Rx battery pack (see below about safety).
Tracking tape, I use 'day-glo' orange and yellow.
A magnifier for checking correct ball link orientation and anything else with which standard eyesight is unable to come up with the goods. I find a watchmakers 'loupe' very useful (particularly when working on sub-micro helis) and also posess a binocular model makers magnifier with head strap that looks very silly, but allows prescription eyeglasses to be worn as well.
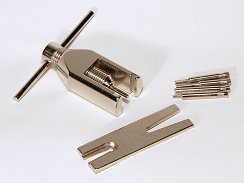
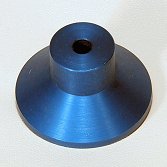
Pinion (gear) puller (see above) & vice for removing & installing brass pinions on small motor shafts. These occasionally have other uses, where something needs forceably removing without damage.
Additional Set-up Tools & Equipment
In addition, here are some additional nice to have/make life easier products.

Fancy blade balancer with bearings (some will allow head and prop balancing too).
Centre of gravity blade balancer with additional support fittings for a single blade.
Electronic scales (accurate to at least 0.1g), useful for crude blade balancing and matching; also for weighing small helis or components.

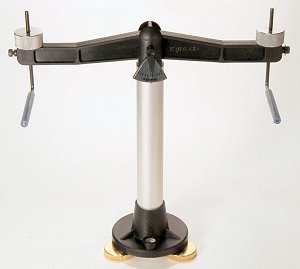
Turntable, for gyro function testing and preliminary tail set-up (also main blade tracking, if tethered – see below).
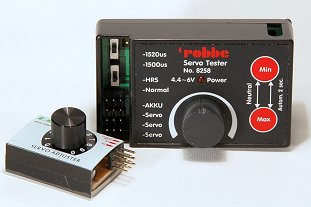
Servo tester/electronic centering device; no need to set up the Tx and Rx, really useful when first attaching servo horns centrally. The one on the left is a simple cheap Esky offering. I have to say, that for accurate centring, the Robbe one is much better.
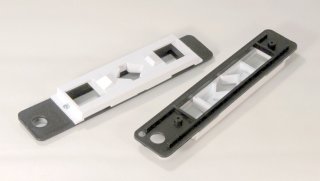
Flybar paddle levellers; these slide onto the flybar paddles in the same way as a pitch gauge engages with the blades. One paddle is levelled to be at 0 deg (with the swashplate level) and the other is set parallel by ensuring that the paddle levellers are level and parallel.
Fancy pitch gauge with bubble levels and flybar lock, luxury item for gadget freaks, but nice for checking cyclic control range without needing three hands (see here).
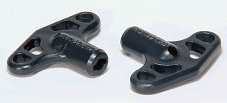
Ball link adjuster tools (x2), to spare your thumbs.

Ball link sizers, hard to find the right size, particularly for micro-helis.
Ball link gauge, luxury item, calipers can be used but are better with ball link adapters, which are not easy to find.
Swash levelling tool, usually a flying soucer shaped object that slides down the main axis, or, like the up-market one also illustrated, designed to slip over the swashplate without necessarily having to disassemble all of the head; equipped with bubble levels. Seldom very convenient to use. Alternative tool: British Standard eyeball.
A selection of light greases and oils is useful to have, but read ChopperAddict's caution 'What lubricants should you use'. For a wonderful bearing greaser go to Section 12.
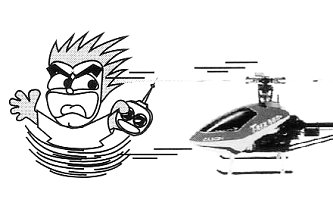
Yes they are great fun, but think, even a tiny 'toy' one could damage an eye. Whilst big helis automatically command respect (well, from most people, but not all – just go to YouTube...), the smaller 250 to 450 size are not as obviously dangerous.
Here's what the manual for my little 535mm long Esky Honey Bee King II heli says:
This radio controlled model is not a toy! It is a recreational machine designed by
combining high-tech products, to some degree, it has fatalness when operating, so please
take care of yourself. Model products are technically operated consumption products,
it may cause various damage of spare parts after disassemble and installation.
Any badness or dissatisfaction caused from use cannot be replaced with new one or returned...
Remote controlled helicopters and airplanes are high dangerous products, please keep them
far away from crowded people. Any factitious improper assemble or damage of parts,
electronic controlled parts damage, and unconversant operation may cause accident of losing control.
OK, the language is quaint (my Chinese is non-existent - good try Esky), but the meaning is crystal clear.
Put bluntly, RC helis can and have maimed and killed and serious injuries have been caused even by the smaller ones. Set-up, particularly on electric helis, is potentially more dangerous than regular flying because you have to be closer to the heli when it's powered up and if not done right, can cause accidents.
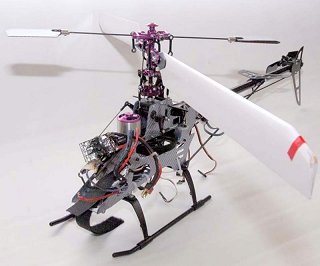
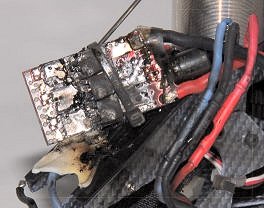
The poor Esky Belt CP in the picture was the result of my carelessness whilst setting it up indoors. The Tx was in 'histogram' mode to check the servo inputs and I accidently knocked the control wheel, putting it into 'test mode', which varies all the channel inputs to check for mechanical binding. Unfortunately it also varies the throttle input and my ESC was powered and armed. The heli spooled up unbidden in my living room and proceeded to thrash itself to pieces on the carpet (the 'funky chicken heli dance of death'). To add insult to injury, the Esky ESC decided it had had enough and burst into flames!
Since the accident with the Belt CP, I take a number of precautions when working on electric helis that I will describe below. As a brief postscript, that heli was rebuilt and later extensively modified (with decent mechanics and electronics) and is now one of my favourites to fly (see here). Don't be put off, safe set-up, like safe flying is wholly achievable, but needs knowledge, care and respect.
What follows is a must-read. However, whilst the advice is to the best of my belief and understanding very sensible and I follow it myself, I cannot accept any responsibility for any adverse consequences resulting from you following or attempting to follow it, or for subsequent product or component failures and their consequences. You take full responsibility for your own safety, the safety of people around you and for any property damage when setting up or operating any model. In saying that, I'm assuming that you are a responsible adult. It usually says on the box (and in the manual as quoted above) that RC helis are not toys and should not be operated by anyone under 14 years of age. I think this is way too young without older (skilled) supervision. Safety critical instructions in this and all subsequent sections of this guide are highlighted in red.
Having the right tools helps with safety, but the main danger with electric RC helis is when the motor's ESC is energised. Unlike a gas or nitro heli, an electric heli initially makes no warning noise (other than the odd 'beep') and has no centrifugal clutch. Being in striking distance or grabbing the head or blades during an accidental spool-up can be a very bad idea. Once the motor is running, blade tip speeds are often well in excess of 100mph.
With an IC powered heli, the battery only powers the electronics and most set-up prior to blade tracking is done without any danger from the rotating components. Small to medium size electric helis are completely different because the battery that powers the electronics is also often the same one that powers the motor. I suggest that when you are setting up the Rx, servos, main rotor head travel, blade pitch and tail pitch slider travel on such an electric heli (in fact anything other than the 'hot' ESC settings or throttle end points), just don't connect the main flight battery.
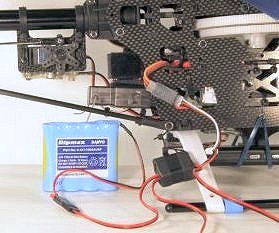
So what powers the Rx, servos and gyro if the BEC isn't powered you may ask? On all my larger electric helis, I install a short servo extension to the the Rx throttle channel (Channel 1 (Spektrum) or Channel 3 (Futaba)) so I can get at it once the Rx is tucked away in the heli's body. The throttle/power lead plugs into the extension in an accessible place, where it can be safely tucked away for flight, but allows me to easily disconnect it for set-up. I then connect a 4.8v 1100mAh NiCd 4 cell Rx battery pack to the Rx via the extension lead via a switch. For 'cold' programing of the Castle Creation ESCs, I can also plug into the disconnected throttle/power lead with my USB interface. Problem sorted, no danger from the motor.
Some people suggest using the main LiPo flight battery throughout set-up, but disconnecting the motor when it's not wanted. You can do this, but I don't like this for several reasons.
One, to be safe, with brushless motors, at least two of the three motor wires need to be disconnected and (with any type of motor) one can forget to do it.
Two, the wires from a brushless motor come straight from the windings and are quite fragile and hard to repair if they break.
Three, the LiPo can deliver tens, maybe hundreds of amps if shorted, you don't need more than a few hundred mA for initial set-up; a small NiCd is quite adequate and safer.
Four, with the LiPo connected, the ESC is still powered and may not appreciate having no load (or if it's an Esky ESC it could fail unexpectedly and set on fire while you are working on the heli).
During 'hot' ESC programing, or when running the motor cannot be avoided, as during throttle end point set-up, disengage the motor pinion from the main drive gear and re-tighten the mounting bolts enough to hold it securely away from mesh. If possible, set up the slowest spool-up rate on the ESC, at least to begin with. Beware of a Futaba Tx, the throttle channel is reversed compared to most other makes.
Some people think that brushless motors can be damaged by running them at full throttle without load. I'm not sure that they can since the ESC controls the timing and magnitude of the currents delivered to the windings and the top speed is limited, as always, by the maximum voltage delivered to the motor (which depends on the battery – see Section 7); so surely only slight overspeeding can result. Also, outrunner motor magnets are on the inside, so cannot fly off. If you are really worried about running at full throttle without load, leave the motor in mesh but remove the main blades and the tail blades (to stop the heli slewing around or sucking debris into the tail rotor). The flybar is still a potential hazard, so make sure the paddles are loctited and secure or weight the heli skids to the bench. However, I think it is much safer to disengage the motor and I've never had a problem.
IC powered helis are not entirely without hidden dangers, particularly when you've just set them up. While the engine turns at low revs, the clutch does not engage and the rotor head does not spool up. However, if the throttle is open too far during starting (a 'hot start') the clutch can engage. This is why when starting a nitro heli, pilots always hold the rotor head (some even put a foot on a skid too). Always check that the throttle is operating in the correct direction (closed is usually clockwise on the carb rotor looking from the throttle linkage side, but check the manual) and that there are no switch settings on the Tx that have set the throttle above idle. In the event of a hot start, because there is a clutch, it is possible to restrain a nitro heli long enough to rip off the fuel tube to the carb.
Whenever running the motor with the gearing engaged or throttling up an IC engine, keep a good distance away and avoid loose clothing/dangling jewelry as you would if operating industrial machinery. Also, if you don't wear plastic lens eye glasses, use safety specs or goggles and avoid having your face, particularly your eyes, at flybar level. Lock any animals or children away (you know what I mean!) and discourage spectators (unless they know more than you about RC helis).
Main blade tracking and head speed measurement pose particular problems since the blades have to be on. Never handhold a running heli to check blade tracking unless it is a sub-micro – even then take care. Some people make clamping tables, often on turntables for tracking and tail adjustment. This can work, but a firmly clamped heli can have resonances and try to shake itself to bits, so some compliance, in the shape of foam or rubber, may be needed. Also, if only the skids are held down, the fixing screws could tear out – consider replacing self-tappers used for this with small bolts anyway (also see here). A turntable is a useful guard against reversed or ineffectual gyros because the problem shows up early in spool-up. A heli on a high friction surface can jump around without warning at high head speed. Having said this, a reversed gyro should be detectable before spool-up by checking the direction it moves the servo when the heli is turned by hand! (see Section 6). Again, when first spooling up with blades on, use some form of eye protection and stay at a reasonable distance (I regard this as 12 feet minimum with my Trex 500!). I try to avoid running up any heli above Walkera 4G6 size indoors if they have blades on. Obviously IC helis should never even be started indoors because of the poisonous exhaust fumes. I will cover my methods of tail and tracking set-up (and head speed measurement) in a later section. As with bench running, keep animals and at-risk humans away when testing helis outdoors.
Correct fail safe settings should be either programmed into the Tx and/or set during binding of a 2.4GHz system (check the Tx and Rx manuals). With helis it is normal to ensure that the throttle is closed and the flight controls set to neutral in the event of losing the radio link.
With 35MHz kit it is vital that you turn the Tx on before connecting the heli flight battery and disconnect it before turning off the Tx. With 2.4GHz this is less critical, but is still good practice. Set the throttle/collective to minimum before connecting the heli and always use a throttle cut switch on an electric heli (or throttle hold switch set at 0% on an electric heli or to idle on an IC heli) after the gyro has initialised, if there is any chance of accidentally knocking the collective/throttle. However, some ESC manufacturers suggest connecting the flight battery with the throttle set half way up so that the ESC does not arm straight away – check on this. Lowering the throttle/collective to minimum then arms the ESC and you can be standing back; from then on the throttle cut or hold should be used when the heli is on the ground and still powered.
Never leave the main flight battery of an electric heli connected any longer than necessary and avoid carrying the heli once it's live. It's OK to carry an IC heli, provided its only idling, but beware knocking the throttle. Be very careful of the idle up switch with any type of heli (read this). If this has been used during set-up (or any other non-standard throttle curves etc.) make sure the flight settings are restored on a programable Tx before conducting trimming flights. Non 3D and pre-aerobatic fliers are advised to inhibit the Idle 2/3 settings that might have been enabled during set-up for setting up negative pitch range and throttle endpoints.
Although it's not set-up, correct assembly affects safety during set-up. Most importantly, ensure that that main and tail blade grips are correctly installed and locked to the feathering shaft. Sometimes, 'nyloc' nuts are used, but usually it's bolts. Clean out the (internal) feathering shaft threads with alcohol to remove oil or grease from manufacture and loctite the bolts. Do not use loctite on nyloc (or any plastic), they don't need, or appreciate, it. Finally, do not overspeed wood blades or plastic heads (this is covered later). LiPo battery safety is not really set-up either, but you must check it out elsewhere (start with Handling LIPO batteries and Things to watch out for with LIPO batteries). Don't leave LiPos in helis between set-up tasks or when using sharp tools on the heli! Store them away safely in fireproof LiPo bags and/or metal containers when not needed.
You can find some additional notes by ChopperAddict here:
Preparing a new helicopter for it's first flight
A CNC (bling) parts warning !
<1 You'll need some tools, some are specialist, but not expensive.
<2 RC helis are great fun, but can cause nasty injuries, they have maimed and even killed.
<3 Safe set-up, like safe flying, is a matter of respect, knowledge and good practice.
<4 With electric helis, minimise the setup time spent with the LiPo connected.
<5 If you have to power an ESC during set-up, disengage the motor or remove all blades.
<6 Treat the heli like you would a machine tool; keep a safe distance away when spooling up.
Go to next section – 4. Head mechanical set-up >
5 Radio 6 Tail 7 Motor 8 Blades 9 Pitch 10 Test 11 Def 12 Stuff >>
<<< ChopperAddict home <<< GatleyGallery RC Helis
© John E Wilson 2011.