 |
RC Helicopter Set-up by HollyHeli (John Wilson) |
|
RC Helicopter Set-up by HollyHeli (John Wilson) |
Before we can do the final main rotor head set-up and tail set-up, we need to be able to correctly drive the servos (usually 4) that control these functions. If you do not have a computer radio transmitter, the options a very limited, which is either going to be a relief or a frustration.
Many FP 'trainer' helis (and some CP ones) are sold with a Tx and Rx, which these days are often 2.4GHz units that will already give better results than the 35MHz kit that was standard when I started. Provided you do not want to modify the heli too much, this will probably do for a while. Usually the only adjustments available on simple Txs are servo reverser switches. Sometimes, you can also turn off the 'mixing' (see below), which is useful for sims.
A computer radio offers far, far greater control and adaptability and most people find that it has features that make flying easier. The investment is fairly safe because it is difficult to crash a radio. However, with 2.4GHz kit, a replacement compatible Rx will almost certainly needed as well.
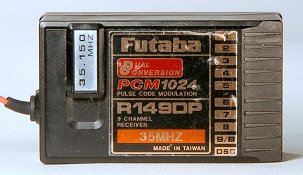
For ChopperAddict's views, see: 'About the various types of radio systems'. Also, if you are using 35MHz kit, read his notes on 'Where to run your radio aerial when using a 35MHz radio', but note that there are special 'whip' antennas that have a 'loading coil' built into them, allowing a much shorter installation (I have successfully used these on both helis and my 'foamy' that I have flown several 100 feet up).
OK, so before getting down to specifics, we first need to know a bit more about radio control channels and mixing. By the way, we are not talking about frequency channels (crystals etc.) but about the channels the radio has to independently operate different functions on the model (Txs and Rxs are generally sold as 'six channel', 'seven channel' etc.).
To fly a FP heli, we need to continually send a minimum of 4 independent commands. Each is assigned a 'channel number'. The numbering conventions on Futaba radios differ slightly from others, such as Spektrum and JR. All Tx functions are for Mode II.
Channel 1. Left-hand Tx stick fore & aft. Throttle (alters head speed); controls hover height, climb or sink rate & translational (forward, backward or sideways) speed. Channel 3 on Futaba (also reversed, beware!).
Channel 2. Right-hand Tx stick left & right. Aileron (cyclic roll); controls port & starboard hover and bank angle in forward or backward flight. Channel 1 on Futaba.
Channel 3. Right-hand Tx stick fore & aft. Elevator (fore-aft cyclic); controls forward & backward hover and pitch attitude/speed in forward or backward flight. Channel 2 on Futaba.
Channel 4. Left-hand Tx stick left & right. Rudder; controls yaw and pirouette (often connected via the gyro).
Channel 5 (not essential). Toggle switch on Tx. 'Gear'. So called from 'plank' usage for 'landing gear', often used for gyro mode switching rate/head hold (see Section 6).
For a CP heli, we need an additional channel to control collective pitch (which determines hover height and translational speed), so a minimum of 5 channels is required (a 6th is useful for gyro control). Actually, the aileron and (collective) pitch channels are interchangeable (see later). Whilst the collective pitch is also is an independent command, it is linked to the throttle channel (1 or 3) and both are controlled, in Mode II by the left-hand stick. The throttle channel and the collective channel each has a control characteristic called a 'curve', which relates the stick position to the throttle and pitch demand. Computer radios let you define a 'throttle curve' and a 'pitch curve' for the throttle and collective functions respectively. More than one pair of curves may be selected using 'flight mode' programing (more to follow).
Channel 6. Left-hand Tx stick fore & aft. Collective (pitch); controls hover height & translational speed. Different flight modes select different curves (applies also to Channel 1/3 for CP).
If you are lucky or rich enough to possess a Tx and Rx with more channels, you can use them for all sorts of other things, like:
Control of Helicommand stabilisation modes, triggering a camera, FPV controls, turning on lights, controlling scale retractable gear, dropping bomb, firing missiles...
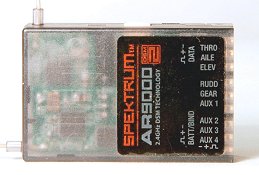
With regard to the confusing differences in channel naming conventions, it's not that bad. If you have, for instance, a Futaba Tx using a Spektrum Tx module and a Spektrum Rx, set-up the throttle using Channel 3 on the Tx as you would for an all Futaba system, but plug it into Channel 1 on the Rx (in fact, Spektrum Rxs do not use numbers, just follow the labels). The Rx doesn't really care what is plugged into it (as someone said 'it's a brainless chap'), the channel allocations are made at the Tx end. Presumably the Spektrum Tx module 'translates' from Futaba to Spektrum (presumably the same would apply to JR modules).
You might like to read ChopperAddict's 'What servos connect to what connections in the RX (Radio Receiver)' for some other examples of Rxs.
The servo leads are plugged into the appropriate Rx channels (there is only one correct way, you cannot reverse servo function by reversing the connections, although you can do no harm). The throttle connection is obvious, it comes from the ESC (or via a BEC if you have a separate one). The elevator servo is the front or back one driving the swashplate fore and aft tilt and the rudder channel is usually connected via the gyro (the servo connects to the gyro 'female' connector and the gyro 'male' connector goes to the Channel 4 of the Rx). The confusion starts with a CP heli, because there are two 'aileron' servos each side of the swashplate and only one aileron channel (Ch 2). Read on and all will be explained!
When we talked about flybars and damping, we used the term 'mixing' in a mechanical sense. You can also do mixing electronically. The simplest RC helis are the FP ones. They only really need four channels, as we have seen above, with only two channels controlling the cyclic functions. The swashplate only needs an elevator and aileron servo to tilt it fore & aft or sideways, each servo only does one or the other. Then the CP heli came along and the designers had to add a collective control servo to move the swashplate up and down, whilst keeping it level. Some helis (e.g. the endearingly named Raptors) still use this method, but you need robust servos, because each one has all the work to do on its own.
Then someone had the bright idea of making the three servos support and control the swash plate, working as a team. So, instead of having two cyclic servos at 90 deg, controlling pitch and roll separately, why not have three set at, say, 120 deg, one in front or behind and two to the side.
Then, for pitch (elevator), all three can rock the swashplate fore & aft (left animation). For roll (aileron), the two side ones work in opposition and the elevator-only servo takes a rest (right animation). But, actually, the elevator servo has a second function and the ailerons a third function. You've probably guessed already, all three servos move the swash up and down to adjust collective pitch.
All this has one advantage that you can get a bigger movement when tilting the swash if more than one servo does it (one up and one down, or two down and one up, or two up and one down). The second advantage is that we are combining the power of two and sometimes three servos. Also, to answer the question left hanging at the end of the previous sub-section, it doesn't really matter which 'aileron' servo is plugged into the aileron channel. The one that is not in the 'aileron' channel (Ch 2) can go in Channel 6 (Aux 1 on Spektrum), sometimes known as 'collective'. The Tx will sort it all out (see next paragraph).
The downside of this shared arrangement (there's always a downside) is twofold, but not so bad. First, you need matched servos, but you would probably use the same type anyway. Secondly, something needs to coordinate the movements of the servos. This is called Cyclic/Collective Pitch Mixing (CCPM for short) and is usually done by the Tx. Occasionally, it is done 'on board', for instance if you are using a Helicommand, but this is unusual. So, let's set up our (programable) Tx.
First, if you are still using 35MHz, select the modulation system (PPM or PCM, PCM is better). PCM allows you to set up fail-safes in case of loss of Tx signal. Spektrum 2.4GHz systems have a very similar system which you initialise when binding the Tx to the Rx (see below). Read the manual carefully first and re-bind after set-up (particularly throttle end point setting) is finished to make sure that the throttle fail-safe is current.
Having selected the modulation, select 'Helicopter', name a new model and start configuring the settings. If your heli is FP, you need no CCPM mixing, if it's CP you probably do. Futaba calls this PARAMETER which sets the type (airoplane/heli swash type) e.g. HELI (SR-3)
However, before looking at the Tx menus, we need a brief introduction to flight modes. If you are comfortable with these, skip this next few paragraphs.
Flight Modes
Most Txs intended for CP helis have flight mode switch on the top left (just occasionally, with Walkera, for instance, its on the right). On simple non-computer radios this is the dreaded 'idle up' switch. Like most newbies, I tried this out on my new HB CP2 without reading the manual ('idle' sounds pretty laid back, like 'tick-over', even when spelt 'idel') and got a shock when it went to full throttle with the left stick fully down. If you don't believe me, read what ChopperAddict has to say. Computer radios are bit more subtle, they have the same switch, often a three position one, but you can inhibit the idle up modes or set them to 'normal' settings to make things safer until you become familiar with the switches.
So, what's it all this idle up stuff about? In normal mode (used when learning to hover), the head speed is progressively increased from zero as you raise the throttle/collective (left-hand Tx stick in Mode II). At the same time, the collective pitch increases (often linearly) from being very slightly negative (typically -2 or -3 deg) to being more positive. The heli takes off at between +4 deg and +6 deg pitch and 80% throttle (this leaves some extra power for higher pitch angles (typically 9 to 11 deg maximum at 100% throttle).
The relationship between the stick position and the throttle and collective pitch settings is defined by signals sent out on their respective channels (Ch 1/3 and Ch 6). On a computer radio this relationship can be customised by the pilot by means of adjustable throttle and pitch 'curves' (simple radios have them pre-programmed – sometimes a couple of knobs allow some variation – see here).
The normal flight mode with -2 to -3 deg of negative pitch is fine for hovering where you do not want the heli to drop out of the sky on lowering the collective. However, in forward flight and wind, you need more negative pitch, say -4 to -5 deg, just to descend and you do not want the head speed to drop. If you want to do flips, fly loops, or stay inverted you need at least -6 deg, preferably -9 to -10 deg to enable inverted climbs at low stick. The animation shows the pitch angle corresponding to a fully lowered collective for normal mode, idle-1 and throttle hold (see below).
So, enter the idle up or 'stunt' modes. The simple Tx has one (very extreme) one; in idle up, the pitch goes from full negative to full positive as the collective is raised and the power stays near 100% throughout (it might drop to 90% or 80% mid-stick to prevent overspeeding at or near 0 deg pitch). This allows symmetrical flight characteristics and is essential for sustained inverted hovers. Computer radios often have a second or even third idle up mode that can be programmed at will. Some people like a milder 'idle-1' mode for fast forward flight which has maybe -5% low stick pitch (and maintains near constant head speed) and a fully symmetrical 'idle-2' mode, like the simple Tx, for 3D.
Regarding set-up, a knowledge of flight mode switching and programming is essential for correctly adjusting a CP head. The full range of travel and centre (0 deg) position of the swashplate can only be determined with a linear pitch 'curve' spanning maximum negative to maximum positive pitch. In normal flight mode, 0 deg pitch is at an indeterminate point at about 1/3 stick, but depends on the pitch 'curve'. The 0 deg pitch datum is best set up mechanically on the head with the collective stick at precisely halfway up. On a computer radio this is the 'idle-2' mode described above and the 0 deg pitch setting can usually be confirmed on the Tx display. On a non-programable Tx you usually cannot see the pitch setting on a display, so it also must be switched to idle up for centre stick position to be correct (making sure there is not power to the motor).
Finally, if the ESC end points need setting, it is best to program a linear throttle 'curve' (unlike pitch 'curves' they usually are curved).
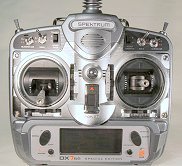
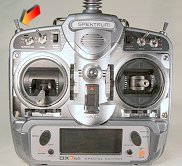
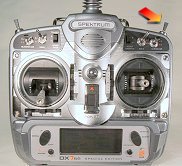
I have a Spektrum DX7 se and a pair of (now obsolete) Futaba 9Cs modular Txs. Since Spektrums are so popular, I'll run through the menu and include some examples of typical or starter settings based on my Align Trex 500. A lot of settings can be left at the default helicopter setting, however, some, like channel reversing, are highly specific to a particular heli, servos or gyro. If you have a Futaba or JR radio, there will be equivalent settings, I'll try and mention less than obvious variations for Futaba. Hopefully someone might add the JR equivalents (and any others) later.
Spektrum DX7 se settings
SWASH TYPE Set this up first – 3 servo/120 deg CCPM Choose from non-CCPM and CCPM options (2 180 deg servos, 3 120 deg servos, 3 90 deg servos), see here for Futaba equivalents.
TIMER DOWN-T Count down to beep (time to battery 80% discharge – determine by trial and error – 9 min for Trex 500 with 6S pack 12T pussy flying).
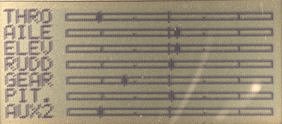
Histogram Bar chart/histogram of Channels 1 to 7 THRO, AILE, ELEV, RUDD, GEAR, PIT., AUX2. Because this is a heli radio Ch6 is labeled pitch. Futaba calls this the SERVO menu, which has a test mode that can get you into all sorts of trouble!
D/R & EXP Dual Rates sets switchable sensitivity of aile, elev and rudd. Exponential is similar but only works on centre of stick. Positive exp means LESS sensitive.
AUTO D/R EXP You can assign dual rates for aile, elev and rudd to each flight mode and then you won't even use the switches.
REVERSING This is the only way of reversing a servo, but gyros often have a switch of their own. I think the Spektrum default is reverse (why?).
SUB TRIM This allows centering of servos if the horns don't quite line up right at electrical centre. With a HH gyro leave RUDD at 0% unless it can cope with trim (see Section 6). Futaba include trim settings as well as an alternative to using the ubiquitous digital trim tabs next to the sticks.
TRAVEL ADJUST Also known as ATV or END POINT (Futaba). Not so useful on helis, rudder travel is often set on the gyro, cyclic & collective travel is set using SWASH MIX, see next.
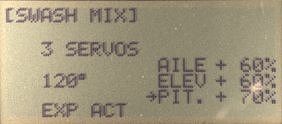
SWASH MIX 3 SERVOS 120 deg; AILE; +60% ELEV; +60% PIT; +70%. My settings to give +-11 deg collective & +-6 deg cyclic, yours will probably differ a bit, particularly if it's not a Trex 500 head with the same servos. Futaba calls it SWASH AFR (RATE).
THRO HOLD HOLD POS. 0.0% >SW:RUDD D/R . For safety, set at 0.0%. For bail-out autos, you might want to temporarily increase it to an idle level. Futaba also has THR-CUT; MIX; ON/OFF RATE; 0% THR; 5% SW; H; POSI; UP which works with the trainer switch & is impossible to cancel accidentally – you have to hold the switch against its spring & raise the throttle to the programmed level (5% here) to cancel it – brilliant.
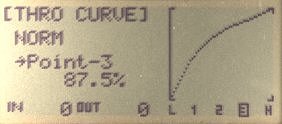
THRO CURVE NORM L; 0.0% 1; 50.0% 2; 75.0% 3; 87.5% H; 100.0% EXP; ON. This is a typical 5 point curve smoothed with expo.
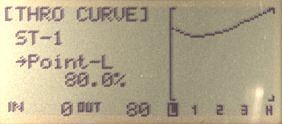
THRO CURVE ST-1 L; 80.0% 1; 70.0% 2; 75.0% 3; 87.5% H; 100.0% EXP; ON. This is one for forward flight & windy days. Futaba puts idle up modes in 'advanced'.
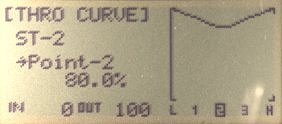
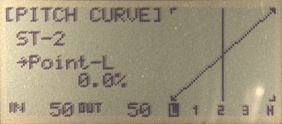
THRO CURVE ST-2 L; 100.0% 1; 90.0% 2; 80.0% 3; 90.0% H; 100.0% EXP; ON . Do not try this at home – one for the brave. The book says 100%, 95%, 90%, 95%, 100%, which just sounds too scary yet!
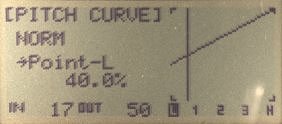
PITCH CURVE NORM L; 40.0% 1; INH 2; 70.0% 3; INH H; 100.0% EXP; OFF. 'INH' means that points 1 and 3 are ignored, so you get a 3 point 'curve'. On my heli these settings give a linear pitch range from -2 deg to +11 deg. 'EXP' is not useful if the 'curve' is linear (i.e. a straight line) since there is no smoothing to be done.
PITCH CURVE ST-1 L; 28.0% 1; INH 2; 64.0% 3; INH H; 100.0% EXP; OFF. And this gives slightly more negative pitch (about -5 deg) for getting it down.

PITCH CURVE ST-2 L; 0.0% 1; INH 2; 50.0% 3; INH H; 100.0% EXP; OFF. This is a symmetrical one giving, with my heli's mechanical set-up, -11 to +11 deg for stunts & set-up.
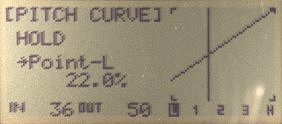
PITCH CURVE HOLD L; 22.0% 1; INH 2; 61.0% 3; INH H; 100.0% EXP; OFF. For practicing autos using the throttle hold, set to taste. This gives -6 deg at minimum collective on my beast.
REVO MIX NORM; UP; 0% DN; 0% STNT; UP; 0% DN; 0%. This is for rate giros only. Futaba also have a fancy GYRO SENS. menu in the advanced menus, but this can also be set on any computer Tx using 'end points' and will be discussed in Section 6
PROG. MIX 1-3 INH . There are 3 additional customised mixes available, but this is more advanced stuff, not needed for set-up.
Also see ChopperAddict's 'Basic Throttle & Pitch curves for DX6i etc.' and 'How to make your helicopter "softer" with a DX6i or similar radio'.
We now have an initial set-up for a CP CCPM model. If your machine does not require CCPM set up on the Tx and/or is FP, the appropriate option must be set for swash type, usually '1 servo', 'non-CCPM' or 'SWH1'. Channels 2, 3 and 6 (1, 2 and 6 with Futaba), will separately control each of the servos (if it's FP there will be no Channel 6).
If you are using the older 'FM' radio system, typically on 35MHz (UK) or 72MHz (US), you only need to match the channel frequency by setting the same (crystal) frequency on Tx and Rx.
However, 2.4GHz systems, like the Spektrum 'spread spectrum' system and Futaba's FASST, require that you bind the Rx to a particular Tx (and in some cases, model) to enable unique control. Spektrum use a 'bind plug' that connects together the signal and neutral connectors on the Bat port of the receiver. It works like this. ChopperAddict describes 'How to bind the E-Sky 2.4Ghz TX to a different helicopter/RX'.
Having got the Tx talking to the Rx and roughly set up the correct model parameters, the first job is to set up the servo mid positions. For the moment, don't worry about how much the swash moves, the default TRAVEL ADJUST and SWASH MIX values will get us started and we will sort out the correct directions of movement as described in the next sub-section. The swash travel range and pitch angles can only be set up accurately when the main rotor blades are on (Section 9).
You may remember that in the previous section we agreed that with the servos centred, the horn should be at right angles to, or in line with, the servo, so that the links to the swash are as near to 90 deg to the horn as possible when the head is at 0 deg pitch and level. This also applies to the tail rotor pitch servo, where the long push rod wants to be as close to 90 deg to the servo horn, which itself should be at 90 deg to the boom at mid travel.
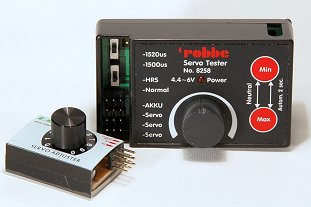
First, the servos should be set to their electrical centres and the servo horns installed on the splined (grooved) output shafts at right angles to the servo body. How do we find the electrical centre? Well, the best way is to use a servo tester with a centering facility. This might be a graduated knob that can be centered, or a push button (on mine it is two push buttons that you press simultaneously).
Here's the drill. If necessary, unplug each servo in turn from the Rx and plug it into the tester, then centre it. Slide on the servo horn as close to its correct centred orientation as possible. If you have a choice of horns, or if they have multiple lever arms in a 'star' configuration, find the one that centers closest. Put the screw in to retain the horn, but don't overtighten it. Some people use threadlock if the servos have metal gears and output shafts; do not use threadlock on plastic, it will attack it. Re-connect all the servos to the Rx. If you get the channels wrong, you will soon find out when you start to set up the servo and head movement directions.
If you do not have a servo tester, you will have to use the Tx and Rx to drive the servos to their central positions, which is obviously halfway between the two extremes. However, you have to be sure that the Tx travel adjust settings are not artificially restricting the servo's range of movement. To check this on a computer radio, increase both upper and lower end points for the channel driving the servo. You may also need to increase the dual rate setting or swash mix rates temporarily to make sure you are fully driving the servos. Do all of this without any links attached to the horns, so as not to stall and overload the servo due to restricted swash, head or tail pitch slider movement (binding).
Fine adjustment of the servo horns to 0 deg or 90 deg to the servo can now be done with the sub-trim settings on the Tx, however, the collective must be at 0 deg pitch and the cyclic centered. There must be no trims applied. You may want to omit sub-trim for the tail pitch servo if you are using a head hold gyro only in that mode (see next section). The sub-trims work just on the individual servos even when there is CCPM. However, the servo reversing should be checked first.
Most Txs have some provision for adjusting hover pitch and throttle by elevating or lowering the throttle or pitch curve around the central region. This adjustment, whether using 'digital trims' or adjustment knobs on the Tx (check the Tx manual), should be set to zero/centred prior to set-up of the head in the same way as the trims are.
Where there is no mixing, setting the servo direction is easy, the swash should tilt the way the cyclic is moved and (probably) up for increasing collective pitch (sometimes this is reversed, see Section 4). The channel setting is either normal or reverse, to get the correct motion.
You can try to do the same for a CCPM set-up, but because the three cyclic servos are working as a team, sometimes the directions get mixed up and individual servo reversing isn't enough. This is where the swash mix (or AFR) comes in.
As well as controlling the aileron, elevator and collective pitch sensitivity or rate, it controls the direction, not just of individual servos, but the whole function, depending on whether the number you set is positive or negative. So, for aileron it will reverse both side servos and for elevator or collective it will reverse all three, but in different ways. Confused? You should be. In practice, it's not that bad, a bit of trial and error works wonders, it is always possible to get things correct by experimenting with the settings. Honest.
To paraphrase my Align manual:
The aileron and pitch channels are interchangeable. Once they are assigned, raise the collective; if one or two swashplate servos move down, adjust the reversing setting(s) so it/they move up (REVERSING menu). If all three move down, reverse the sign (+/-) of the collective swash travel adjust rate (PIT in the SWASH MIX/AFR menu). If the actions of either the aileron and elevator functions (not individual servos) are reversed, adjust the sign (+/-) of the respective cyclic swash travel adjust rate (AILE or ELEV in the SWASH MIX/AFR menu).
The tail pitch servo is easy, it doesn't interact with anything else, so the servo reversing alone can be used. However, the gyro reversing also has to be right and cannot be corrected at the Tx. We will talk about tail set-up in the next section.
<1 Computer radios are best.
<2 CP helis need at least 6 channels, aileron and (collective) pitch channels are interchangeable
<3 Cyclic/Collective Pitch Mixing (CCPM) gets the servos working together.
<4 Different flight modes need different throttle and pitch curves.
<5 Electrically centre servos: horns at 0 or 90 deg at 0 deg blade pitch (or tail pitch slider centre).
<6 Servo reversing menu + swash mix menu = correct CCPM function.
<< 1 Intro 2 Helis 3 Safety 4 Head
Go to next section – 6. Tail rotor & Gyro >
7 Motor 8 Blades 9 Pitch 10 Test 11 Def 12 Stuff >>
<<< ChopperAddict home <<< GatleyGallery RC Helis
© John E Wilson 2009.